

EC2にRedmineをインストールしました!せっかくの機会なんで、作業メモをここに残します。
インストールに必要な全ての手順を網羅しているので、真似してみて下さい。
EC2を含めたAWSのサービスを、ハンズオン形式で学ぶなら動画で学べるUdemy
![]() の講座がぴったりです。
の講座がぴったりです。
\ AWS学習の決定版!30日以内なら返品もOK! /
AWSのおすすめ書籍については、以下にまとめております。

前提条件
今回、インストールしていくソフトウェアのバージョンは以下の通りです。
| ソフトウェア | バージョン |
|---|---|
| httpd | 2.4.46 |
| MySQL | Ver 14.14 Distrib 5.6.50 |
| Ruby | 2.5.0 |
| Ruby on Rails | 6.1.0 |
| passenger | 6.0.7 |
| Redmine | 4.0.1 |
EC2のOSはAmazon Linux 2 AMI (HVM), SSD Volume Typeです。
モジュールのインストール
まず最初にrootユーザーに切り替えます。
$ sudo -s色々とインストールしていきます。
$ yum -y update
$ yum -y install selinux-policy-targeted policycoreutils-python
$ yum -y install gcc kernel-devel kernel-headers gcc-c++ glibc-headers openssl-devel
$ yum -y install git
$ yum -y install readline-devel libxml2 libxslt libxml2-devel libxslt-devel
$ yum -y install curl-devel
$ yum -y install ImageMagick ImageMagick-devel
SELINUX=disabledにします。
$ vim /etc/sysconfig/selinux

# This file controls the state of SELinux on the system.
# SELINUX= can take one of these three values:
#     enforcing - SELinux security policy is enforced.
#     permissive - SELinux prints warnings instead of enforcing.
#     disabled - No SELinux policy is loaded.
SELINUX=disabled
# SELINUXTYPE= can take one of three two values:
#     targeted - Targeted processes are protected,
#     minimum - Modification of targeted policy. Only selected processes are protected.
#     mls - Multi Level Security protection.
SELINUXTYPE=targeted
httpdをインストール
以下のコマンドでhttpdをインストールします。
$ yum install -y httpd httpd-tools httpd-devel httpd-manual以下のコマンドで、httpdが正常にインストールできているか確認します。
$ httpd -v

Server version: Apache/2.4.46 ()
Server built:   Aug 24 2020 18:54:20
次に所有者を変更して、自動起動を有効にします。
$ chown -R apache. /var/log/httpd/
$ chkconfig httpd on

情報:'systemctl enable httpd.service'へ転送しています。
Created symlink from /etc/systemd/system/multi-user.target.wants/httpd.service to /usr/lib/systemd/system/httpd.service.
MySQLのインストール
以下のコマンドでMySQLをインストールします。
$ rpm -ihv http://dev.mysql.com/get/mysql-community-release-el6-5.noarch.rpm
$ yum -y install mysql-server mysql-devel
MySQLが正常にインストールできているか確認します。
$ mysql --version

mysql  Ver 14.14 Distrib 5.6.50, for Linux (x86_64) using  EditLine wrapper
MySQLの起動
MySQLの起動コマンドを実行します。MySQLが起動するまでは、少し時間がかかるので焦らずに待ちましょう。
$ chkconfig mysqld on
$ service mysqld start

Starting mysqld (via systemctl):                           [  OK  ]
MySQLの設定
では次に、初期セットアップを行います。
$ /usr/bin/mysql_secure_installation

NOTE: RUNNING ALL PARTS OF THIS SCRIPT IS RECOMMENDED FOR ALL MySQL
      SERVERS IN PRODUCTION USE!  PLEASE READ EACH STEP CAREFULLY!

In order to log into MySQL to secure it, we'll need the current
password for the root user.  If you've just installed MySQL, and
you haven't set the root password yet, the password will be blank,
so you should just press enter here.

Enter current password for root (enter for none):
OK, successfully used password, moving on...

Setting the root password ensures that nobody can log into the MySQL
root user without the proper authorisation.

Set root password? [Y/n] y
New password:
Re-enter new password:
Password updated successfully!
Reloading privilege tables..
 ... Success!


By default, a MySQL installation has an anonymous user, allowing anyone
to log into MySQL without having to have a user account created for
them.  This is intended only for testing, and to make the installation
go a bit smoother.  You should remove them before moving into a
production environment.

Remove anonymous users? [Y/n] y
 ... Success!

Normally, root should only be allowed to connect from 'localhost'.  This
ensures that someone cannot guess at the root password from the network.

Disallow root login remotely? [Y/n] n
 ... skipping.

By default, MySQL comes with a database named 'test' that anyone can
access.  This is also intended only for testing, and should be removed
before moving into a production environment.

Remove test database and access to it? [Y/n] y
 - Dropping test database...
ERROR 1008 (HY000) at line 1: Can't drop database 'test'; database doesn't exist
 ... Failed!  Not critical, keep moving...
 - Removing privileges on test database...
 ... Success!

Reloading the privilege tables will ensure that all changes made so far
will take effect immediately.

Reload privilege tables now? [Y/n] y
 ... Success!

All done!  If you've completed all of the above steps, your MySQL
installation should now be secure.

Thanks for using MySQL!


Cleaning up...
データベースの作成
Redmineで使うためのDBを作成します。
$ mysql -uroot -p

mysql> create database redmine default character set utf8;
Query OK, 1 row affected (0.00 sec)
DBが出来ているかを確認します。
mysql> show databases;
+--------------------+
| Database           |
+--------------------+
| information_schema |
| mysql              |
| performance_schema |
| redmine            |
+--------------------+
4 rows in set (0.00 sec)
GRANT権限を持つユーザを作ります。これで特定のデータベースだけにアクセス出来るユーザーが出来ます。
mysql> GRANT ALL PRIVILEGES ON `redmine`.* TO 'redmine'@'localhost' identified by 'redmine';
Query OK, 0 rows affected (0.00 sec)

mysql> exit;
Bye
Rubyをインストール
rbenvをインストール
Rubyのバージョンを複数管理出来るように、rbenvをインストールします。
インストールが終わったら、reboot(再起動)をします。
$ git clone https://github.com/sstephenson/rbenv.git /usr/local/src/.rbenv/
$ echo 'export RBENV_ROOT="/usr/local/src/.rbenv"' >> /etc/profile.d/rbenv.sh
$ echo 'export PATH="${RBENV_ROOT}/bin:${PATH}"' >> /etc/profile.d/rbenv.sh
$ echo 'eval "$(rbenv init -)"' >> /etc/profile.d/rbenv.sh

$ cat /etc/profile.d/rbenv.sh
export RBENV_ROOT="/usr/local/src/.rbenv"
export PATH="${RBENV_ROOT}/bin:${PATH}"
eval "$(rbenv init -)"

$ reboot
reboot(再起動)をすると、EC2からログアウトされるので、再度rootユーザーでログインし直します。
$ env | grep RBENV
RBENV_ROOT=/usr/local/src/.rbenv
RBENV_SHELL=bash

$ rbenv --version
rbenv 1.1.2-40-g62d7798

$ git clone https://github.com/sstephenson/ruby-build.git /usr/local/src/.rbenv/plugins/ruby-build
Rubyのインストール
rbenvを経由して、Rubyをインストールします。
$ rbenv install -v 2.5.0

$ rbenv rehash

$ rbenv global 2.5.0

$ ruby -v
ruby 2.5.0p0 (2017-12-25 revision 61468) [x86_64-linux]
Railsをインストール
以下のコマンドでRailsをインストールします。
$ gem update --system
$ gem install nokogiri -- --use-system-libraries
$ gem install bundler -N
$ gem install -N rails
$ rbenv rehash
$ rails -v
Rails 6.1.0
Passengerをインストール
ここで事前にRedmineをインストールするフォルダを作成します。
$ mkdir -p /opt/local/redmine/srcそして、Passengerをインストールしていきます。
インストールに少々時間がかかると思います。
$ gem install passenger -N
$ rbenv rehash
$ passenger-install-apache2-module
$ passenger-install-apache2-module --snippet > /etc/httpd/conf.d/passenger.conf
Passengerの設定
Passengerのインストールが完了したら、設定ファイルを以下のように修正します。
$ vim /etc/httpd/conf.d/passenger.conf
<Directory "/opt/local/redmine/src/redmine-4.0.1/public">
  Require all granted
</Directory>
LoadModule passenger_module /usr/local/src/.rbenv/versions/2.5.0/lib/ruby/gems/2.5.0/gems/passenger-6.0.7/buildout/apache2/mod_passenger.so
<IfModule mod_passenger.c>
  PassengerRoot /usr/local/src/.rbenv/versions/2.5.0/lib/ruby/gems/2.5.0/gems/passenger-6.0.7
  PassengerDefaultRuby /usr/local/src/.rbenv/versions/2.5.0/bin/ruby
</IfModule>
Redmineのインストール
さて、いよいよRedmineのインストールに進みます。あと少しです!
まずはRedmine本体をダウンロードしてきます。
$ cd /opt/local/redmine/src
$ wget http://www.redmine.org/releases/redmine-4.0.1.tar.gz
$ tar zxf redmine-4.0.1.tar.gz
次にDBの設定ファイルである「database.yml」を修正します。
$ cd redmine-4.0.1/
$ cp config/database.yml.example config/database.yml

$ vim config/database.yml

# Default setup is given for MySQL with ruby1.9.
# Examples for PostgreSQL, SQLite3 and SQL Server can be found at the end.
# Line indentation must be 2 spaces (no tabs).

production:
  adapter: mysql2
  database: redmine
  host: localhost
  username: redmine # <= ここを変更する
  password: redmine # <= ここを変更する
  encoding: utf8
そして、bundleをインストールします。
$ mkdir -p app/assets/config
$ touch app/assets/config/manifest.js
$ vim app/assets/config/manifest.js
  //= link_tree ../images
  //= link_directory ../javascripts .js
  //= link_directory ../stylesheets .css

$ bundle install --without development test
$ bundle exec rake generate_secret_token
$ RAILS_ENV=production bundle exec rake db:migrate
$ RAILS_ENV=production REDMINE_LANG=ja bundle exec rake redmine:load_default_data
httpdの設定更新
Redmineのインストールが終わったら、httpdの設定を更新します。
$ vim /etc/httpd/conf/httpd.conf
DocumentRoot "/opt/local/redmine/src/redmine-4.0.1/public"

$ cd /opt/local/redmine/src/
$ chown -R apache. redmine-4.0.1
$ service httpd restart
Redirecting to /bin/systemctl restart httpd.service

$ service httpd status
Redirecting to /bin/systemctl status httpd.service
● httpd.service - The Apache HTTP Server
   Loaded: loaded (/usr/lib/systemd/system/httpd.service; enabled; vendor preset: disabled)
   Active: active (running) since 火 2020-12-22 10:32:35 UTC; 16s ago
     Docs: man:httpd.service(8)
 Main PID: 13971 (httpd)
   Status: "Total requests: 0; Idle/Busy workers 100/0;Requests/sec: 0; Bytes served/sec:   0 B/sec"
   CGroup: /system.slice/httpd.service
           ├─13971 /usr/sbin/httpd -DFOREGROUND
           ├─13974 /usr/sbin/httpd -DFOREGROUND
           ├─13975 /usr/sbin/httpd -DFOREGROUND
           ├─13976 /usr/sbin/httpd -DFOREGROUND
           ├─13977 /usr/sbin/httpd -DFOREGROUND
           └─13978 /usr/sbin/httpd -DFOREGROUND

12月 22 10:32:35 ip-10-0-1-10.ap-northeast-1.compute.internal systemd[1]: Starting The Apache HTTP Server...
12月 22 10:32:35 ip-10-0-1-10.ap-northeast-1.compute.internal systemd[1]: Started The Apache HTTP Server.
Redmineの起動
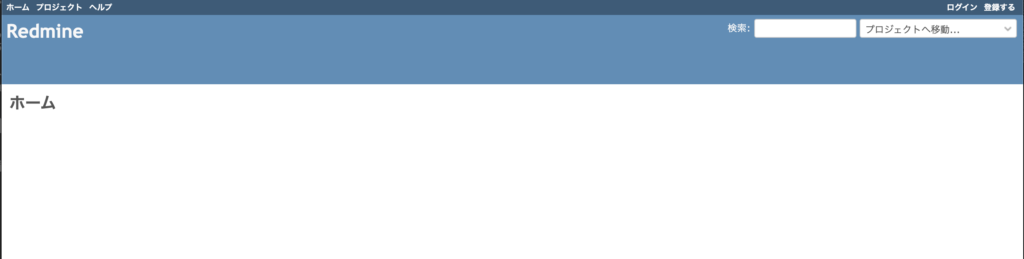
ここまでの作業が完了したら、「http://インスタンスのパブリックIP」をブラウザに入力して、Enterボタンを押下して下さい!
Redmineのホーム画面が出れば、インストール成功しています。
 エソラ
エソラ長かったですね。お疲れさまでした!
EC2を含めたAWSのサービスを、ハンズオン形式で学ぶなら、動画で学べるUdemy
![]() の講座がぴったりです。
の講座がぴったりです。
\ AWS学習の決定版!30日以内なら返品もOK! /
AWSのおすすめ書籍については、以下にまとめております。

コメント